
A (not so ) Basic Bike Fit : Part 3 Bike Fit Joint Angles
Putting it together - basic bike fit joint angle measurements
The most important consideration in any basic bike fit has to do with the proper joint angles. But we can't lose sight of the fact that the rules aren't rigid lines but rather guides that can be massaged as the need arises. Because of the wide range of individuals, and with them countless combinations of body types, movement restrictions, medical histories, etc, there are many circumstances where someone cannot fit inside the box.I'll give you an example: take the amount of knee extension at the bottom of the pedal stroke. Not too many years ago, it was generally agreed that the acceptable range for his measurement was that the knee should come between 25°-35° from full knee extension. But these numbers were taken from the era of static measuring in bike fitting -- literally when the fitter would have to have the rider stop pedaling, position their foot at the bottom of the pedal stroke, adjust the ankle....somehow.....and then measure the angle of the knee using a goniometer (which is like a big protractor) by hand. Those of us using dynamic motion capture for our fittings knew that these numbers were just plain wrong, and the accepted range was adjusted to 35°-45°. Over the last decade and a half I've learned from thousands of bike fittings and I would asterisk even this range as a case can be made in many circumstances to push the range to 34°-48° and even this may not be enough. I have had more than a few clients that run in the low 50°s very comfortably and safely; push them into the upper or mid-40°s and they develop saddle, low back and knee issues.Is this ideal? Maybe not. Could this cyclist achieve better results if they improved certain aspects of their functional movement to allow them to extend their knee more without issue in their pedal stroke? Probably, but we have to address the movement of the cyclist as it exists, not as we would like it to be, or according to some ideal we have in our mind as to how cyclists should ride.It will be best to address the ankle first since it will play a major role in some of the decisions we make at the knee.
Ankle
The ankle is the coordination mechanism in our pedal stroke. As it changes position it better allows us to keep the forces perpendicular to the crank arms which creates more consistent power output, but it also changes to ease our movement through whole cycle, especially on the back end of the pedal stroke in the recovery phase.So what's ideal? It might be easier to say what isn't ideal. The main positions we're going to concern ourselves with are 12, 3, and 6 o'clock also known as top-dead-center, forward or horizontal crank position, and bottom dead center. I like to use the clock references since they make the most sense.As simple as it seems , the ankle is poorly understood, primarily because the understanding of the purpose and nature of an effective pedal stroke has changed a lot in the last 40 years. For much longer than four decades, cyclists have been attaching their feet to the pedals to execute a more effective pedal stroke, and with the advent of the clipless pedal, the focus of a properly executed pedal stroke has been a hot topic with lots of conflicting information. Suffice it to say that some degree of "pulling up" on the pedals at the back of the pedal stroke has been the focus, which seemed to peak about 15-20 years ago. Back then many cyclists were performing one leg drills in order to train their body to get stronger at pulling up on the back of the pedal stroke, all in an effort to eliminate the negative torque that we exert on the pedal during the recovery phase. Reduce or eliminate the negative torque and you get more power, right?Well, it turns out that it's probably not the case. First because the muscles that we use to pull up on the pedals, our hip flexors, were never meant to be prime movers, meaning that they're not very good at exerting force by pulling up like that. Second, it turns out that focusing on pulling up may interfere with pushing down, and since pushing down produces a lot more force than pulling up ever will, this seemed like a bad deal.I'm of the opinion that doing one leg drills may not be a complete waste of time though. Why? When done correctly, I think they can be used to improve coordination of our pedal stroke. We've all seen the pro cyclist whose pedal stroke looks fluid and perfect, and we've also seen the rider that looks disjointed and appears to be pedaling in the proverbial "squares". What gives between those two? Coordination. A recent study showed that professional cyclists pedaled with a greater degree of ankle motion than their recreational brethren.This coordination comes from the ankle and foot, as evidenced by the fact that it has the most variability in it's range of motion at any particular point in the pedal stroke. The hip and the knee both flex more at the top of the stroke and extend more at the bottom, and their angles in between those two extremes are pretty predictably in the middle. For example, a rider may have a knee angle of 140° at the bottom of the pedal stroke and 67° at the top. In between the top and the bottom, the knee is bent somewhere between 67° and 140°. Pretty predictable.The ankle is very different. It's maximum or minimum (plantarflexion and dorsiflexion) angles will vary wildly, as will another measurement of the foot that assesses the angle the foot makes relative to the ground. A rider could have a 104° ankle angle at the 12 o'clock position, 90° at 3 o'clock, 100° at 6 o'clock, and 105° at 9 o'clock. More telling is what angle the foot makes with the ground. A common sequence would be 35° at 12 o'clock, all the way down to 5° at 3 o'clock, back up to 25° at 6 o'clock and pushing past 40° at 9 o'clock. It is this variability that creates our coordination.The ankle and foot position are the pieces that are making large adjustments in order to expedite the process of getting our legs turned in this circle quickly. This is why in a bike fit we need to address the ankle not from a brute strength approach but rather to aid in it's coordination efforts. (I've got news for you: the muscles that control the foot and ankle, the calf and intrinsic foot muscles, suck at power generation.)So if this ankle and foot motion varies so widely, what ranges can we hold them to in a bike fit? Are there numbers that we can reliably refer to in order to check the validity of a certain cycling position?Yes and no. Again in this case, it may be easier to describe what we shouldn't see, and provide some loose rules about what we'd like to see. As discussed we're going to look at two measurements -- the ankle angle and the angle that the foot makes with the ground. So here are my rules for the ankle and foot:
Ankle Angle
- Throughout the pedal stroke it will hover around 90 degrees. 90° is the neutral position of the ankle
- Roughly 15° on either side of this neutral position is generally acceptable -- so from 75° (also known as 15° of dorsiflexion) to 105° (15° of plantarflexion)
- There is such a thing as too little movement of the ankle - it tends to show a lack of dynamic action through the lower extremity and can often be seen as a poorly coordinated pedal stroke.
- The more fit the rider, and the more dynamic and coordinated their pedal stroke -- higher cadence, more power; think elite cyclists -- the greater the amount of total ankle motion.
- In the power phase of the stroke, just before and after 3 o'clock, the ankle should be near 90° or in its neutral position (5 on either side is acceptable - 85°-95°) as this is going to be the most powerful posture.
Foot relative to the ground
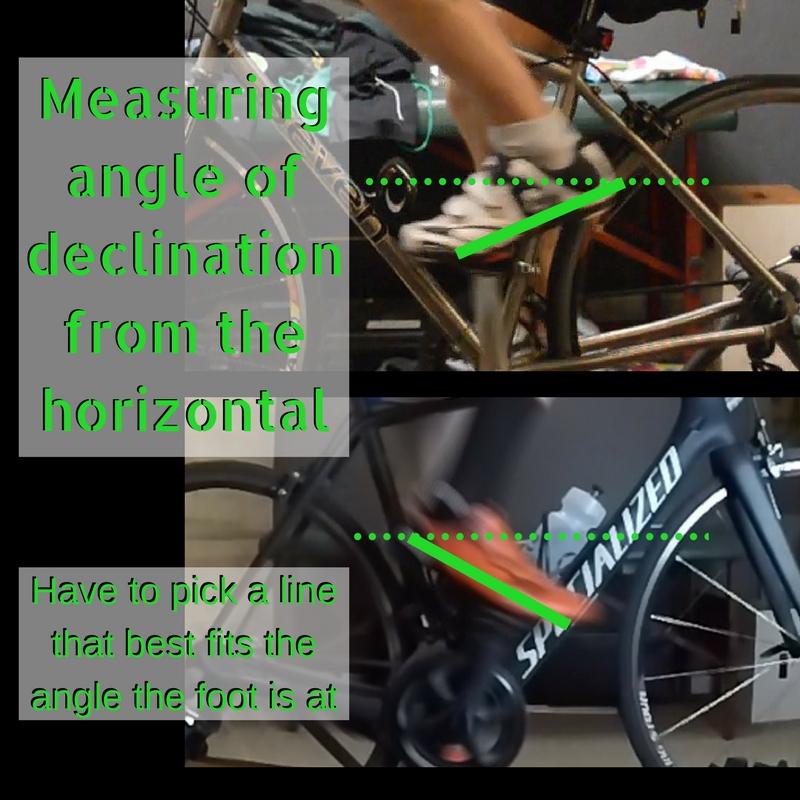 Much of our focus will be on the measurement of the angle that the foot makes relative to the ground. While some cyclists do show problems with their ankle angle - meaning how much plantaflexion or dorsiflexion the ankle joint is in at any given point - it's much more common that pedaling issues will arise from poor orientation of the foot relative to the ground. It's necessary to still consider both measurements in assessing a rider's fit but often the predominant focus will be on the foot's angle.As usual we'll address the foot relative to ground measurement from our three cardinal positions during the power phase:
12 o'clock
At 12 o'clock we often exhibit our greatest foot angle, usually somewhere around 30°. If we're getting up close to 40+ this can create problems in many cyclists as the stability of the foot and ankle begin to come into question. If stability is decreasing here so is power generation.If maximum angle here is ~35°-40°, is there a minimum? Yes, somewhere around 15°. Between 15°-35°, increasing toe down will make it easier to get the foot through the top of the pedal stroke because at the top of the stroke, toeing down translates the knee forward, putting it in position to begin the bulk of the powerful down-stroke sooner. Too much toe-down, puts the knee forward too soon, before its able to initiate the down-stroke.40° is likely going to be fine especially the fitter the cyclist is (think elite), but we need to be aware of the reasons and issues with going near or above 40° create.As bike fitters, we need to be cognizant of the reasons someone may have less of a toe-down posture in this case. Hip and knee health plays a major role. Many riders will exhibit a flatter foot posture at the top of the stroke because pointing the toe down more flexes the hip and knee more. If they have problems with either of these joints they will naturally, and unconsciously, flatten their foot posture to prevent from getting closer to the end range movement of these joints. This doesn't just apply to older riders with degenerative joint issues, so I want to make clear that severe joint problems aren't necessary in order to see these issues. I have seen riders in their teens and twenties display these mechanics because of even moderate joint and soft tissue restrictions. Often they can easily reach normal ranges of hip or knee motion off the bike, but when but pedaling a bike near 90 rpm changes things. The biggest rule is that because of the speed of teh pedal stroke -- pedaling anywhere near 90 rpm is a very fast task -- our body will protect our joints by allowing us to work in only a portion of the available motion, especially the faster the task.So a rider may have 10° of toe down at 12 o'clock and this produces a knee angle of 70°. They may be able to get to a knee angle of 55° off the bike (this would be called 125° of knee flexion) but at 85 rpm the body is protecting the knee and not allowing it anywhere near its end range. This is nothing new, as our body does this everywhere else as well. In fact our muscles will work closer to the middle of their total range of motion, and not near the ends, simply because we are strongest in the middle.This example, someone with a lower toe-down posture due to an issue with their hip or knee, is a hallmark reason for some athletes using shorter crank arms. In specific situations like this, having a shorter crank arm length will require less hip and knee flexion, so the rider can more easily pedal through the top of the stroke -- they have less hip/knee flexion, so they can toe-down a few more degrees which eases their movement through the 12 o'clock position.What are we shooting for? We're shooting for 20 to the low 30s, and we need to be aware of the possible causes for having less than this.
3 o'clock
The 3 o'clock position is in the range of the most powerful portion of the pedal stroke, but the parameters for foot position are actually pretty simple. In the prior position at 12 o'clock, the foot is starting in a moderately toe-down posture (again somewhere around 30°), but by the time it gets to 3 o'clock with the application of power we should see it drop into a flatter position -- less toe down.My rules for this position are simple:
- The foot relative to the ground shouldn't be at a negative angle -- we want to maintain a small amount of toe-down posture, or at worst, have a level foot.
- At most it can run through the 3 o'clock position at about 10°-12°.
There are a few different reasons for having more than 10° or a negative amount of toe-down posture as in the 12 o'clock example: poor cleat positioning, unstable ankle and foot mechanics. Restrictions at the hip and knee can play a smaller role than at the top of the pedal stroke simply because these joints are further from their end range at 3 o'clock.What are we shooting for? ~0°-12°
6 o'clock
Things get a little complicated again at the bottom of the pedal stroke; because it is again a "not too much or too little" scenario.What are we shooting for? A maximum amount of toe-down of 20° and a minimum of ~5°.Having some toe-down posture eases the foot through the bottom of the stroke in much the same way it does at the 12 o'clock position. But a flatter foot posture can also be excused to a point because it could represent a rider with an effective finish to their power phase as they pull through the bottom of the stroke to ease the transition to the recovery phase.Having too little toe-down can be a symptom of a low saddle height, a poorly placed cleat (either too far forward or too far back), or just poor ankle mechanics. I see too much toe down at 6 o'clock usually when the saddle is too high, the cleat is too far forward, or the rider has developed some poor ankling strategies, sometimes as a result of something as obscure as having their hips too far forward relative to their feet.What are we shooting for? 5°-20°
Knee
The knee (and the hip for that matter) is a lot less nuanced than the ankle. It's probably the joint that gets thought of and addressed the most when discussing any bike fit. So much attention is placed on it's posture at the bottom of the pedal stroke, but there is a lot to be learned at the top and other places as well.Why do we care how much the knee straightens or bends throughout the pedal stroke? Not surprisingly this plays a major role in what muscles are most active, and whether these muscles are functioning at their best.At the bottom of the pedal stroke (6 o'clock) the knee should straighten enough that the hamstrings, quads, and glutes have been able to exert themselves fully throughout the power phase -- no mall task since their always seems to be a delicate balance of power between the glutes and the quads. But the knee also shouldn't straighten so much that the hamstrings are moved past their effective range (which is different for each person).At the top of the pedal stroke the concern is that the knee shouldn't bend too much. We're rarely concerned that the knee doesn't bend enough at the top of the pedal stroke -- this just isn't an issue. The knee being bent too much at the top prevents the quads and glutes from activating fully and with the proper timing. Additionally, it'll place more compressive force through the kneecap as we begin the power phase of the pedal stroke.We'll look mostly at the top and bottom of the pedal stroke for this basic bike fit lesson.
6 o'clock | Bottom of the Pedal Stroke
The bottom of the pedal stroke is pretty easy to grasp. The straighter the knee is, the higher the saddle height. The big question is how straight should it get? We should note that we're measuring how far away from a completely straight knee we're getting -- we're not using the actual angle of the knee, but rather the resultant angle. So the angle that the knee is at subtracted from 180°. You'll see this more in the videos below.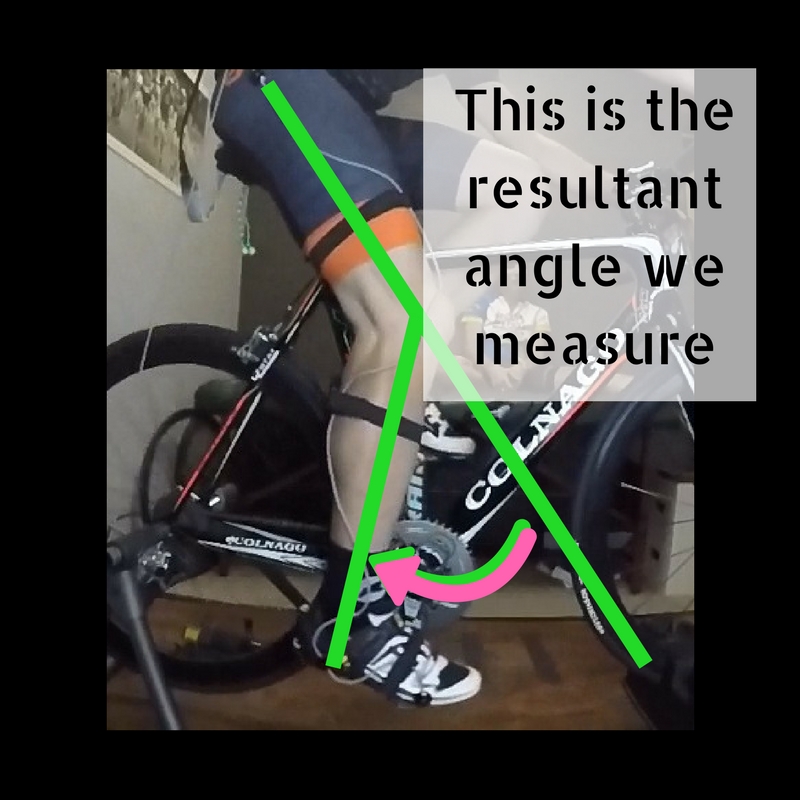 In some antiquated books on fitting and even still online, a 25°-35° angle (from full knee extension) is the acceptable range. Let's just get this out of the way right now that this is just wrong since it's a holdover from the days of static measuring. Static measuring means that it's necessary to have the rider stop pedaling at the bottom of the pedal stroke and measure the knee angle by hand. What this didn't take into account was the natural movement and posture of the ankle in the 6 o'clock position. With the rider's pedal stroke stopped, there was not an accurate way to replicate how the ankle would really be positioned, and the ankle plays a major role in the position of the knee. The more the ankle plantarflexes (or goes into a toe-down posture) the more the knee will be bent.The real knee angle range that we're looking for is 34°-48°. And to clarify, what this is measuring is the actual angle taken from the hip through the knee to the ankle and then subtracted from 180.This is a wide range of acceptable numbers, but each individual rider will have their own much smaller acceptable range. For example, someone whose perfect knee extension number is 42°, might be able to tolerate anywhere from 39°-44° under certain conditions without experiencing major problems. Above or below the ideal 42° may not be quite as efficient, but it might work okay in the short term. As the rides get longer and more intense though, this acceptable window narrows considerably because of the repetitive strain on the body. This is why new cyclists who begin to get more serious about their training and mileage run into trouble. Even experienced cyclists deal with this when training mileage ramps up -- especially towards the beginning of the season.What are we shooting for? 34°-48° (from full knee extension)
12 o'clock | Top of the Pedal Stroke
Knee posture at the top of the pedal stroke is the more ignored side of this story, but a case can be made that it's the more important measurement of the two. This measurement is critical for a few reasons:
- The knee experiences the most flexion (or bending) of the pedal stroke
- Force through the leg increases at this point as the rider begins the power phase of the pedal stroke
These two factors combine to place significant load through the knee joint. The quadriceps, one of the primary muscle groups exerting force on the pedals, contracts and they attach to the lower leg through the patella or kneecap. With quads active and the knee flexed significantly past 90°, the patella experiences compression as it's driven into the femoral groove. Additionally, with the knee bent, the quads are in a stretched position as they are beginning their contraction or tightening phase which puts significant strain on the muscle fibers and connective tissue. Suffice it to say that this is a lot of strain on the knee joint.So in order to have optimal mechanics, we don't want to have too much bend in the knee. How can we decrease bend in the knee?We can raise the seat up. This will keep the knee from bending excessively. But remember that we have already set our saddle height by looking at how straight the knee gets at the bottom of the pedal stroke. If our saddle height has been found to be good when we looked at the knee extension at the bottom of the stroke, what if this still creates too much knee bend at the top of the stroke?What factors could cause this scenario?
- poor ankle mechanics
- Remember, just as the ankle posture at the bottom of the pedal stroke affects how much the knee straightens or bends, it does the same at the top of the pedal stroke. If a rider points their toes down a lot at the top of the pedal stroke this will bend the knee more.
- Excessive pedal stack height
- What is pedal stack height? It's the distance between the bottom of the foot and the center of the pedal axle. This can occur with flat pedals, especially when the rider uses a shoe with a very thick sole, like a cushioning running shoe. But it can also occur with standard clip-in style cycling shoes as well. All shoes have a different amount of material in the sole of the shoe, and the different clip-in pedal styles have different "stack heights" due to the pedal and the cleat construction. Speedplay pedals are an example of this -- they often require an adapter plate underneath the cleat, to allow the 4-bolt cleat to attach to the standard 3-bolt setup of most shoes, and when coupled with a shoe with a thick sole, this can create problems for some cyclists.
- Long crank arms
- Proper knee extension at the bottom of the pedal stroke can be achieved with any crank length, even with one that is much too long. However, when we go to the top of the pedal stroke if the crank is too long it'll cause excessive knee flexion.
- This is a much more common cause of bike fit trouble than most people realize, and also more common than either poor ankle mechanics or excessive pedal stack height.
- How long is too long? This is the $64 million question. If the rider has some pain that we're looking to remedy, often at the knee in these scenarios, it becomes pretty easy to determine if crank length is the issue:
- If saddle height can't be raised any further without causing new problems, like new saddle discomfort or excessive hip rocking, then crank length is more likely to be the culprit of the pain we're trying to fix.
- Put another way, if you've determined through our bike fit process that knee extension and ankle/foot toe-down angles at the bottom are appropriate , but the knee is still flexing too much at the top then we need to look at crank length.
What are we shooting for? ~65°. This equates to ~115° of knee flexion which is attainable for most people. In fact most of us have 125° or more, but we can't go near the end range of a joint especially when it's required to pedal at 85-90 rpm and produce force. For the same reason we don't want to straighten our knee fully at the bottom of the pedal stroke -- our joints and muscles work best closer to the middle of their range.For many cyclists, 115° of knee flexion (or a knee angle of 65°) is still too much. Anyone with a knee flexion limitation such as someone with a previous injury or surgery. Some individuals are just tight, and might have relatively stiff joints. For these people making sure that the knee angle is closer to 70° (or 110° of knee flexion) is critical for them to have a normal uninterrupted pedal stroke. If they are pushed past this limitation, perhaps to a 65 knee angle, they will experience all the same issues that another rider might not experience until they get to 60° (or 120° of knee flexion).These problems can include a shift on the saddle, excessive vertical hip rocking, saddle discomfort, back pain, and more.
Measuring the ankle and knee - standard frame rate
Password: bikefit1https://vimeo.com/198847346
Measuring the ankle knee - higher frame rate
Password: framehttps://vimeo.com/198752614
Hip
Measuring the hip is important, and there are a few different ways to do it and interpret the data.It can be measured by an angle starting at the knee moving through the hip and then finishing through the pelvis. This can be useful, but also a challenge to measure -- setting the angle through the tilt of the pelvis is not the simplest task as the landmarks we have to work with on video are pretty limited.Especially for our purposes here I prefer a simpler measurement technique and one that can have more functional relevance: We'll measure from the knee through the hip and then through the torso up to the shoulder. This provides more "real estate' to work with when setting the second vector since the torso and entire spine gives us more to work with than just the short length that the pelvis does. The functional relevance comes from the fact that this will factor in to some extent, the position of the torso and upper body.Just as with the knee, we're most concerned with the angle at the top of the pedal stroke. The bottom can be important too, at times, but it becomes much less so especially after we've addressed the ankle and the knee at this position -- the hip at 6 o'clock position can become somewhat obsolete, or a redundant measurement after measuring the rest of the leg.At the top of the pedal stroke we're concerned with the hip flexing or closing too much relative to the torso. If a rider's position has them moving too close to the end range of hip flexion, the body will shift and contort, sometimes in similar patterns when the knee is forced outside its comfort zone.This measurement will have a wide variety of acceptable ranges for one main reason:
- It is combining measurements through a few different joints -- the hip, pelvis and spine. Rolling these together into one measurement will increase the variability.
Since individuals can have large differences in hip/spinal strength and mobility this will create larger ranges in the outcome of this measurement.
12 o'clock
This is the critical measurement as it was for the knee as well. We're going to measure it a little differently than we did the knee because we're not going to stick strictly with our landmarks. The angle measured will go from the knee through the hip but then it will follow the angle that the torso rests at. More specifically we'll try to best represent the angle of the spine as a whole. Think of it as a best fitting straight line that parallels the spine.What are we shooting for? Most riders that are less flexible or more recreational ought to stick to 52°-58°. The rider with greater fitness and mobility levels can run in the range from 44°-50°.This measurement will be affected by many things:
- A lower saddle height will make it lower. With the saddle lower, the hip will flex more and the angle the thigh makes with the torso/spine gets smaller as they get closer together.
- A more aggressive (longer and lower) handlebar position will make it lower. With the handlebar in a more aggressive position the torso will pitch forward, bringing it closer to the thigh at the top of the pedal stroke. Conversely, then a more upright position will make it greater.
- The longer your crank arm the smaller the number gets. This can become another method for determining if you have cranks that are too long. For example, a recreational rider has a knee extension angle of 42° at the bottom of the pedal stroke with a "normal" ankle measurement of 18 to match. At the top of the pedal stroke, however they are borderline with a 62° angle for knee flexion (the knee is flexed 118°). If they have a hip angle at the top of the pedal stroke of 50 then this might be the deciding factor that they indeed would benefit from shorter crank arms.
- So in addition to shortening the crank arm and raising the saddle, another way to increase this hip angle is to raise the handlebars or move them slightly closer to the saddle to raise the torso.
Basic Measuring of the Hip
Password: hip pelvishttps://vimeo.com/198759402We've addressed much of the movement for the lower body from this side view -- this view is called the sagittal plane. Of course there's motion that needs to be tracked in other planes like the frontal plane (i.e. how much the knee travels laterally and what its path looks like from the front of the rider) but this is more than I want to cover in this module. Certainly adding in the assessment of the frontal plane will shed even more light on the rider's movement patterns and how best to address their bike fit, but much of the heavy lifting in any bike fit comes from the assessments we make in the sagittal plane.Check back here shortly and I will run through an assessment on a cyclist or two to further shed light on the finer details of measuring angles and even making decisions on potential changes. We'll take some measurements, look at them in reference to our values that we've set for each joint and see what kind of decisions we can draw from them.